.png)
What is JDBC?
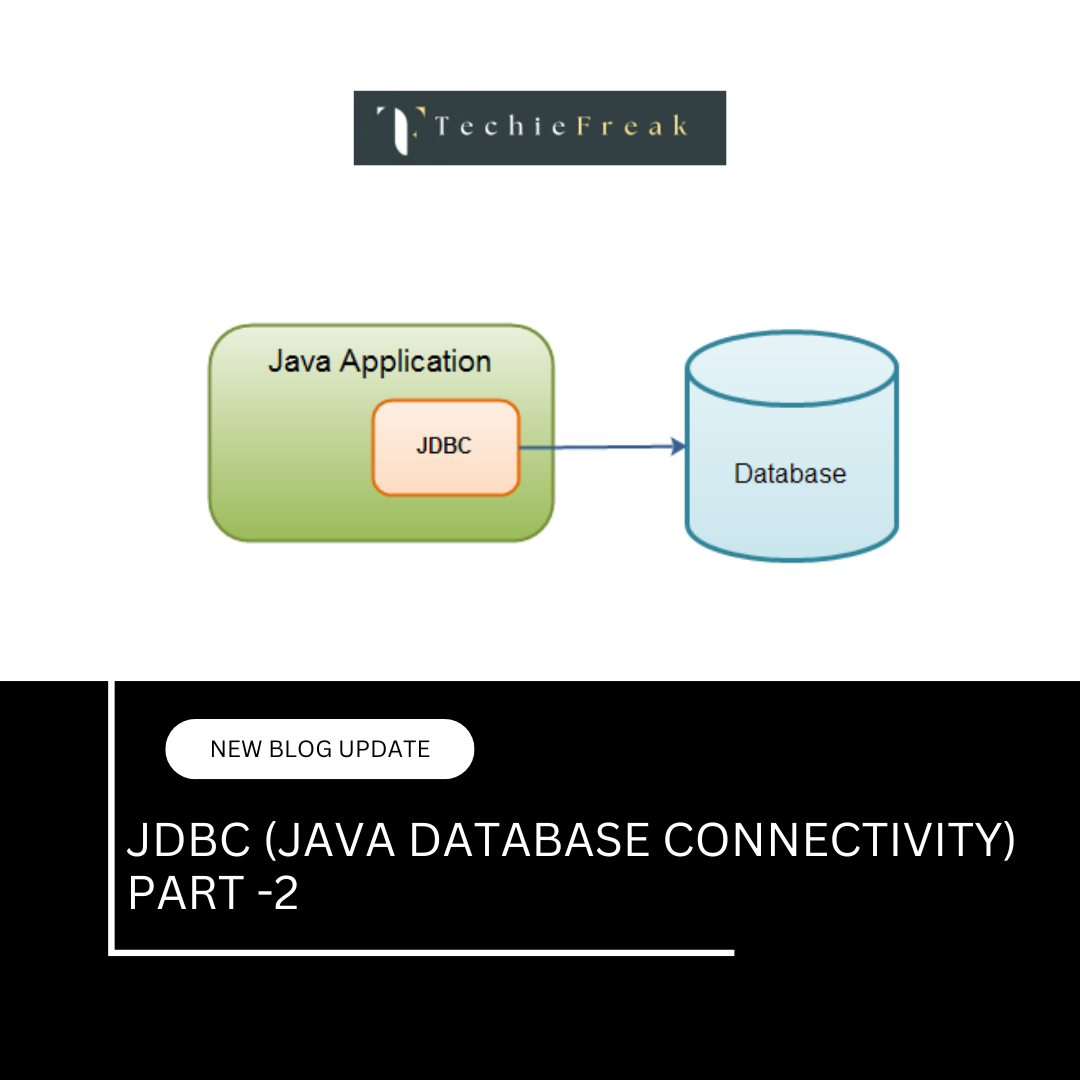
JDBC, or Java Database Connectivity, is a Java API that provides a standard way for Java applications to interact with databases. First released in 1997 with JDK 1.1, it was one of the earliest libraries developed for the Java language.
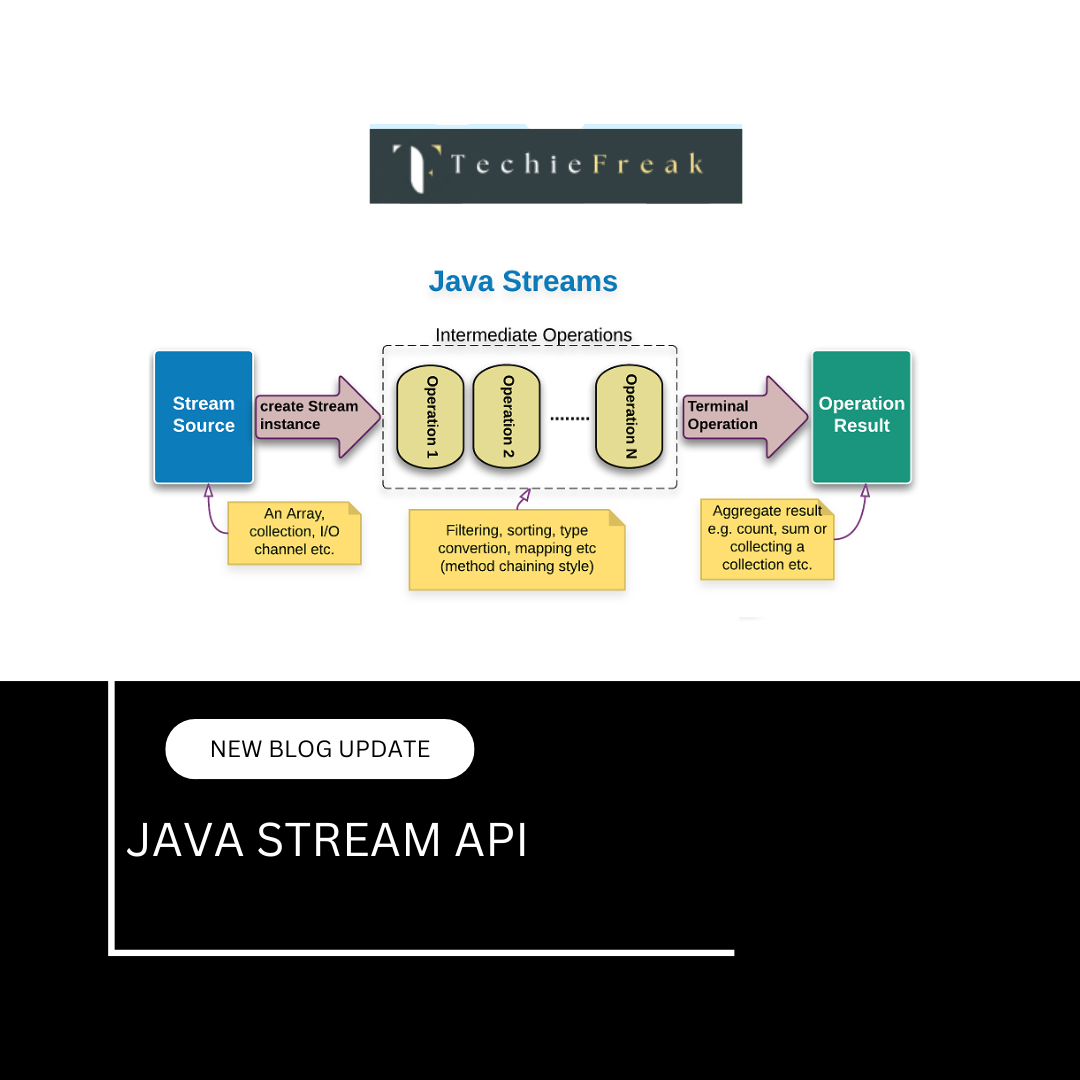
Java has been an evergreen language in almost all computer science domains, whether it will be web development, software development, databases, etc. It has acquired the IT industry to a larger extent. One of the popular Java-based APIs is JDBC (Java Database Connectivity). It provides a natural Java interface for SQL work. To provide a “pure Java” option for application development, JDBC is required.
JDBC (Java Database Connectivity) is a Java API (Application Programming Interface) that enables Java applications to connect to and interact with a database. It provides a standard, platform-independent way to execute SQL queries and retrieve data from a wide range of relational databases
It provides a standard way for Java programs to:
- Connect to a database
- Send SQL queries/statements
- Retrieve results
- Update or manipulate data
It acts as a bridge between Java applications and database systems (like MySQL, Oracle, PostgreSQL, SQL Server, etc.).
In this blog, you will come across a brief introduction to JDBC, what its architecture looks like, what components ‘does’ contribute to JDBC architecture and what are its advantages.
Core Functionality
JDBC defines how a Java client can connect to a database, execute SQL queries and commands, and process the results. It acts as a bridge, abstracting the complexities of communicating with different database systems.
- Establishing a Connection
- JDBC provides methods to connect Java applications with databases.
- Uses the DriverManager class and Connection interface.
- Example:
Connection con = DriverManager.getConnection(
    "jdbc:mysql://localhost:3306/mydb", "user", "password");
2. Executing SQL Statements
- Once connected, you can send SQL commands to the database.
- JDBC provides three main interfaces:
- Statement → for simple SQL queries
- PreparedStatement → for precompiled queries with parameters (prevents SQL injection)
- CallableStatement → for executing stored procedures
PreparedStatement pstmt = con.prepareStatement("INSERT INTO students VALUES(?, ?)");
pstmt.setInt(1, 101);
pstmt.setString(2, "Muskan");
pstmt.executeUpdate();
3. Processing Results
- Queries often return results (e.g., SELECT).
- JDBC uses the ResultSet interface to navigate and read data row by row.
Example:
ResultSet rs = stmt.executeQuery("SELECT * FROM students");
while (rs.next()) {
    System.out.println(rs.getInt("id") + " " + rs.getString("name"));
}
4. Transaction Management
- JDBC allows control over transactions to ensure data consistency.
- By default, every SQL statement is auto-committed, but you can manage it manually.
Example:
con.setAutoCommit(false);
// execute multiple statements
con.commit();   // if successful
con.rollback(); // if any error occurs
5. Error & Exception Handling
- Database errors are handled using SQLException.
- It provides detailed info like error code, SQL state, and message.
Example:
catch (SQLException e) {
    System.out.println("Error: " + e.getMessage());
}
6. Batch Processing
- JDBC allows sending multiple queries together to improve performance.
Example:
Statement stmt = con.createStatement();
stmt.addBatch("INSERT INTO students VALUES (102, 'Isha')");
stmt.addBatch("INSERT INTO students VALUES (103, 'Riya')");
stmt.executeBatch();
7. Metadata Access
- JDBC provides ways to get information about the database (tables, columns, supported features, etc.) using:
- DatabaseMetaData
- ResultSetMetaData
DatabaseMetaData dbmd = con.getMetaData();
System.out.println("DB Product: " + dbmd.getDatabaseProductName());
The Core Functionality of JDBC includes:
- Connecting to databases
- Executing SQL queries & updates
- Processing results (ResultSet)
- Managing transactions (commit/rollback)
- Handling errors (SQLException)
- Batch processing (multiple queries at once)
- Accessing metadata
What is a JDBC Connection?
A JDBC Connection is an object (interface) in the JDBC API that represents a session between a Java application and a database.
Think of it like:
A telephone line between your Java program and the database.
- Without it, they cannot talk to each other.
- Once connected, your program can send SQL queries, fetch results, and update data.
A JDBC connection is the fundamental communication channel established between a Java application and a relational database, facilitated by the Java Database Connectivity (JDBC) API and a specific JDBC driver. JDBC provides a standard way for Java programs to send SQL queries, retrieve, and manipulate data from various database systems like Oracle, MySQL, and PostgreSQL, making data-driven applications possible.
How to Create a JDBC Connection?
A connection is typically created using the DriverManager class:
// Step 1: Load Driver (optional in newer versions)
Class.forName("com.mysql.cj.jdbc.Driver");

// Step 2: Establish Connection
Connection con = DriverManager.getConnection(
    "jdbc:mysql://localhost:3306/mydb", "username", "password");
Here:
- "jdbc:mysql://localhost:3306/mydb" → Database URL
- "username" → DB user
- "password" → DB password
Responsibilities of a JDBC Connection
The Connection object is the backbone of all database interactions. Its main roles:
- Opening Communication
- Establishes a link between Java and the database.
- Creating Statements
- Through methods like:
- createStatement() → for normal queries
- prepareStatement() → for parameterized queries
- prepareCall() → for stored procedures
- Through methods like:
- Transaction Management
Controls commits and rollbacks:
con.setAutoCommit(false); // start transaction con.commit(); // commit changes con.rollback(); // undo changes- Managing Database Settings
- Set isolation levels, read-only modes, catalog selection, etc.
- Closing the Connection
- Frees up resources.
Very important! Not closing connections can lead to memory leaks.
con.close();
Lifecycle of a JDBC Connection
- Load Driver
- Create Connection (DriverManager.getConnection())
- Create Statement (con.createStatement())
- Execute Queries (stmt.executeQuery())
- Process Results (ResultSet)
- Close Connection (con.close())
Example
import java.sql.*;

class JDBCExample {
    public static void main(String args[]) {
        try {
            // 1. Load Driver
            Class.forName("com.mysql.cj.jdbc.Driver");

            // 2. Create Connection
            Connection con = DriverManager.getConnection(
                "jdbc:mysql://localhost:3306/mydb", "root", "password");

            // 3. Create Statement
            Statement stmt = con.createStatement();

            // 4. Execute Query
            ResultSet rs = stmt.executeQuery("SELECT * FROM students");

            // 5. Process Results
            while (rs.next()) {
                System.out.println(rs.getInt(1) + " " + rs.getString(2));
            }

            // 6. Close
            con.close();
        } catch (Exception e) {
            System.out.println(e);
        }
    }
}
Simple database connections and queries
Here’s how you make a basic JDBC connection and run simple SQL queries in Java.
Steps for Simple Database Connection & Query Execution
1. Import Required Packages
import java.sql.*;
2. Load the JDBC Driver
Class.forName("com.mysql.cj.jdbc.Driver");
In newer Java versions, this is optional (driver loads automatically if present in classpath).
3. Establish a Connection
Connection con = DriverManager.getConnection(
    "jdbc:mysql://localhost:3306/mydb", "root", "password");
- mydb = database name
- root = database username
- password = database password
4. Create a Statement
Statement stmt = con.createStatement();
5. Execute Queries
(a) Select Query (Read Data)
ResultSet rs = stmt.executeQuery("SELECT * FROM students");

while (rs.next()) {
    System.out.println(rs.getInt("id") + " " + rs.getString("name"));
}
(b) Insert Query (Add Data)
int result = stmt.executeUpdate("INSERT INTO students VALUES (101, 'Isha')");
System.out.println(result + " record inserted.");
(c) Update Query (Modify Data)
int result = stmt.executeUpdate("UPDATE students SET name='Muskan' WHERE id=101");
System.out.println(result + " record updated.");
(d) Delete Query (Remove Data)
int result = stmt.executeUpdate("DELETE FROM students WHERE id=101");
System.out.println(result + " record deleted.");
6. Close the Connection
stmt.close();
con.close();
Full Example: Simple Connection + Query
import java.sql.*;

class SimpleJDBC {
    public static void main(String args[]) {
        try {
            // Step 1: Load Driver
            Class.forName("com.mysql.cj.jdbc.Driver");

            // Step 2: Establish Connection
            Connection con = DriverManager.getConnection(
                "jdbc:mysql://localhost:3306/mydb", "root", "password");

            // Step 3: Create Statement
            Statement stmt = con.createStatement();

            // Step 4: Execute a Query
            ResultSet rs = stmt.executeQuery("SELECT * FROM students");

            // Step 5: Process Results
            while (rs.next()) {
                System.out.println(rs.getInt(1) + " " + rs.getString(2));
            }

            // Step 6: Close Connection
            con.close();
        } catch (Exception e) {
            System.out.println(e);
        }
    }
}
Components of JDBC
Every API is composed of components, each responsible for its part of the API's functionality. This structure can also be likened to a production line, where each employee has a role in each process.
For instance, we can logically divide the processes into several sub-processes:
- Establish a connection to the database;
- Send an SQL query to the database;
- Receive data in the form of a response;
- Properly interpret this data, adapting it to Java code;
- Transform the data into a more convenient data structure (e.g., a list, collection, or map).
For each of these processes, there is a corresponding component responsible for successfully executing its instructions. Let's get acquainted with these components in more detail:
- Connection: This interface establishes a connection to the database. You use it to create instances of Statement or PreparedStatement;
- Statement and PreparedStatement: These interfaces are used to execute SQL queries. Statement is used for executing static SQL queries without parameters, while PreparedStatement is designed for executing SQL queries with one or more parameters;
- ResultSet: When you execute an SQL query to retrieve data (SELECT), the ResultSet stores the retrieved data, allowing you to process each row of the result sequentially;
DriverManager: This class manages a list of available JDBC drivers. It selects the appropriate driver when establishing a connection to the database.
So, from this, we can draw a conclusion about how responsibilities are distributed in the code:
- The DriverManager and Connection classes perform the first process: Establish a connection to the database. The DriverManagerselects the appropriate driver for the specific DBMS, and the Connection uses this driver to connect the code to the database;
- Statement and PreparedStatement handle the second process, as they allow us to send SQL queries to the database and instruct the database on what data we want to retrieve;
- ResultSet handles the remaining processes. It is with the help of this class and its methods that we can obtain the data in a format convenient for us, such as a List.
Thus, we can see that each of the components serves its purpose. This structure is correct and adheres to SOLID principles.
JDBC Interaction with a Database
Let's examine the interaction of JDBC with a database through code examples.
It may seem complicated at first, but as you progress through the course, especially when working on practical assignments, you will gain a better understanding of how it works and what needs to be done.
To begin with, let's see what the database we will be working with and connecting to looks like. We will be working with the testDatabase schema and the employees table:
To begin with, let's see what the database we will be working with and connecting to looks like. We will be working with the testDatabase schema and the employees table:
| id | name | position | salary | hire_date |
| 1 | John Doe | Software Engineer | 60000.00 | 2021-01-10 |
| 2 | Jane Smith | Project Manager | 65000.00 | 2021-02-15 |
| 3 | Jim Brown | Designer | 55000.00 | 2021-03-01 |
| 4 | Jake Blues | System Analyst | 70000.00 | 2021-04-20 |
A fairly simple table in the database. Now, let's set ourselves the task of retrieving data such as id, name, and salary from the first row in the table (id=1):
package codefinity;

import java.sql.*;

public class HibernateExample {
    static String jdbcUrl = "jdbc:mysql://localhost:3306/testDatabase";
    static String username = "db_username";
    static String password = "db_password";
    public static void main(String[] args) {

        try {
            Connection connection = DriverManager.getConnection(jdbcUrl, username, password);
            PreparedStatement statement = connection.prepareStatement("SELECT * FROM employees");
            ResultSet resultSet = statement.executeQuery();
            if (resultSet.next()) {
                int id = resultSet.getInt("id");
                String name = resultSet.getString("name");
                double salary = resultSet.getDouble("salary");
                System.out.println("ID: " + id + ", Name: " + name + ", Salary: " + salary);
            }
        } catch (SQLException e) {
            throw new RuntimeException(e);
        }
    }
}
Let's go through it step by step:
| Step | Action | Description |
| 1 | Variable Creation | Create String variables to store the database URL (which includes the database name, equivalent to SQL's USE DatabaseName), the MySQL username, and the user's password. Details are hidden for privacy. |
| 2 | Connection Establishment | Use the Connection interface and the DriverManager class to establish a database connection. This involves calling the getConnection() method with the database URL, username, and password as parameters, thereby establishing a connection for sending SQL queries. |
| 3 | Preparing Statement | Employ the prepareStatement() method on the connection object, and assign the resulting prepared statement object to a variable. This object contains the SQL query specified in the method's parameter. |
| 4 | Executing Query | Utilize the executeQuery() method on the prepared statement object, assigning the results to a ResultSet object. This object now holds the results of the executed SQL query. |
| 5 | Retrieving Data | Check for data in the resultSet using the next() method. If data exists, variables are created and assigned values from the first row of the table. The next() method positions us at the 1st row in the table initially, and it's used again to move to subsequent rows. |
| 6 | Assigning Values | Assign values to variables by referencing column names, such as id, name, and salary. Values are taken from the FIRST row in the table, with the process repeated for additional rows as needed using the next() method. |
The output will look like this:
If we want to display all the elements on the screen, we need to change the if condition to a while loop so that we process each element.
It will look like this:
package codefinity;

import java.sql.*;

public class HibernateExample {
    static String jdbcUrl = "jdbc:mysql://localhost:3306/testDatabase";
    static String username = "db_username";
    static String password = "db_password";
    public static void main(String[] args) {

        try {
            Connection connection = DriverManager.getConnection(jdbcUrl, username, password);
            PreparedStatement statement = connection.prepareStatement("SELECT * FROM employees");
            ResultSet resultSet = statement.executeQuery();
            while (resultSet.next()) {
                int id = resultSet.getInt("id");
                String name = resultSet.getString("name");
                double salary = resultSet.getDouble("salary");
                System.out.println("ID: " + id + ", Name: " + name + ", Salary: " + salary);
            }
        } catch (SQLException e) {
            throw new RuntimeException(e);
        }
    }
}
Output:
- ID: 1, Name: John Doe, Salary: 60000.0
- ID: 2, Name: Jane Smith, Salary: 65000.0
- ID: 3, Name: Jim Brown, Salary: 55000.0
- ID: 4, Name: Jake Blues, Salary: 70000.0
JDBC Architecture and Components
There are two architectures of JDBC:
Two-Tier Architecture
A Java applet and application communicates directly with the data source in the two-tier paradigm. This necessitates the use of a JDBC driver that can interface with the data source in question. The user’s commands are transmitted to the database or other data source, and the statements’ results are returned to the user. The data source could be on another machine to which the user has a network connection. A client/server configuration is one in which the user’s machine acts as the client and the system that houses the data source acts as the server. An intranet, for example, can connect people within a company, or the Internet can be used as a network.
Flow:
App → JDBC API → JDBC Driver → Database
Three-Tier Architecture
Commands are sent to a “middle tier” of services in the three-tier paradigm, which subsequently transmits the commands to the data source. The data source interprets the commands and provides the results to the middle tier, which ultimately passes them on to the user. The three-tier architecture appeals to MIS directors because the intermediate tier allows them to maintain control over access and the types of changes that can be made to company data. Another benefit is that it makes application deployment easier. Finally, the three-tier architecture can bring performance benefits in many circumstances.
The components of JDBC are listed below. These elements assist us in interacting with a database. The following are the JDBC components:
- JDBC Driver Manager: In a JDBC application, the Driver Manager loads database-specific drivers. This driver manager makes a database connection. To handle the user request, it additionally makes a database-specific call to the database.
- Driver: A driver is an interface that manages database server connectivity. Communication is handled using DriverManager objects.
- JDBC-ODBC Bridge Drivers: They are used to link database drivers to the database. The JDBC method calls are translated into ODBC method calls by the bridge. To access the ODBC (Open Database Connectivity) characteristics, it uses the sun.jdbc.odbc package, which includes the native library.
- JDBC API: Sun Microsystem has provided JDBC API, which allows you to write a Java program that talks with any database without modifying the code. The JDBC API is implemented by the JDBC Driver.
- JDBC Test Suite: The JDBC Test Suite aids in the testing of JDBC Driver operations such as insertion, deletion, and updating. It aids in determining whether or not the JDBC Drivers will run the program. It ensures that the program will be run by JDBC Drivers with confidence and conformity.
- Database Server: This is the database server that the JDBC client wants to communicate with, such as Oracle, MySQL, SQL Server, and so on.
- Statement: To send SQL statements to the database, you use objects built using this interface. In addition to performing stored procedures, certainly derived interfaces accept parameters.
- RuleSet: These objects retain data retrieved from a database when you use Statement objects to conduct a SQL query. It functions as an iterator, allowing you to cycle through the data it contains.
SQL Exception: This class is responsible for any errors that occur in a database application.
Flow:
App → JDBC API → Middleware → JDBC Driver → Database
JDBC Workflow (Step by Step)
Load Driver
Class.forName("com.mysql.cj.jdbc.Driver");Loads the database driver class.
Establish Connection
Connection con = DriverManager.getConnection(
    "jdbc:mysql://localhost:3306/mydb", "root", "password");
DriverManager selects the right driver and opens a connection.
Create Statement
Statement stmt = con.createStatement();Prepares an object to send SQL queries.
Execute Query
ResultSet rs = stmt.executeQuery("SELECT * FROM students");SQL command is sent to the driver → driver translates into DB-specific commands → DB executes it.
Process Results
while (rs.next()) {
    System.out.println(rs.getInt(1) + " " + rs.getString(2));
}
Close Connection
con.close();
Advantages of JDBC Architecture
- It can read any database. The only condition for it to do so is that all of the drivers be properly installed.
- It pulls information from a database and converts it to XML.
- It does not necessitate the conversion of the content.
- Software maintenance is centralized with no client settings necessary. Because the driver is built in Java, the JDBC URL or a DataSource object has all of the information required to establish a connection.
- It supports queries and stored procedures completely.
- The JDBC API contains a DataSource object that can be used to identify and connect to a data source. This improves the code’s portability and maintainability.
- Both synchronous and asynchronous processing is supported.
- The Java API and the JDBC API work together to make application development simple and cost-effective.
- Modules are supported.
- Even if data is housed on various database management systems, businesses can continue to use their installed databases and access information.
Summary-
JDBC (Java Database Connectivity) is a Java API that enables Java applications to interact with relational databases in a standard and platform-independent way. It provides essential functionality such as establishing connections via DriverManager and Connection, executing SQL statements with Statement, PreparedStatement, or CallableStatement, processing results through ResultSet, managing transactions using commit and rollback, handling errors via SQLException, batch execution, and accessing metadata. A JDBC connection represents the communication channel between a Java program and the database, supported by core components like DriverManager, Connection, Statement/PreparedStatement, ResultSet, and SQLException. JDBC can work in both two-tier (direct connection) and three-tier (via middleware) architectures, following a workflow of loading the driver, establishing the connection, creating statements, executing queries, processing results, and closing the connection. With advantages such as database independence, portability, stored procedure support, centralized maintenance, and flexibility, JDBC remains a cornerstone for Java-based database applications.
To be continued in Part 2…
Next Blog - JDBC (Java Database Connectivity) Part-2
 (17).png)
.png)
 (18).png)

.png)
 (1).png)
 (2).png)
 (3).png)
 (4).png)
 (5).png)
 (6).png)
 (9).png)
 (7).png)
 (10).png)
 (8).png)
 (10).png)
 (12).png)
 (13).png)
 (13).png)
 (15).png)
 (16).png)
 (19).png)
 (20).png)
 (21).png)
 (22).png)
 (23).png)
 (24).png)
 (25).png)
 (26).png)
 (27).png)
 (28).png)
 (29).png)
 (30).png)
 (31).png)
 (32).png)
 (33).png)
 (34).png)
 (35).png)
 (36).png)
 (37).png)
 (38).png)
 (39).png)
 (42).png)